Dimensions
Note: the below documentation is provided by Microsoft. To make sure you are reading the most up to date documentation, please use the official Microsoft Dynamics 365 Business Central documentation link.
Set up dimensions and dimension values
Dimensions can be a useful tool for a company that wants to gain additional insights into its financial data. For example, dimensions can be used to simplify the task of performing analysis on posted cost and income.
A dimension is the type of information that you want to add to your entry. For example, the cost controller wants to analyze the expenses for each department. Instead of setting up separate general ledger accounts for each department, a dimension called Department can be set up.
A dimension value is one of the possible values for a dimension that you can add to your entry. For example, the cost controller can set up a dimension value for each department called Sales, Administration, and so on. Each dimension can have an unlimited series of dimension values that are sub units of that dimension.
Dimensions and dimension values are user-defined and unlimited, meaning that dimensions are customized for each company. The more dimensions that you use, the more detailed reports you will have to base your business decisions on. For example, a single sales entry can include multiple dimension information, such as:
-
The account that the item sale was posted to
-
Where (region) the item was sold
-
Who sold the item
-
The kind of customer who bought the item
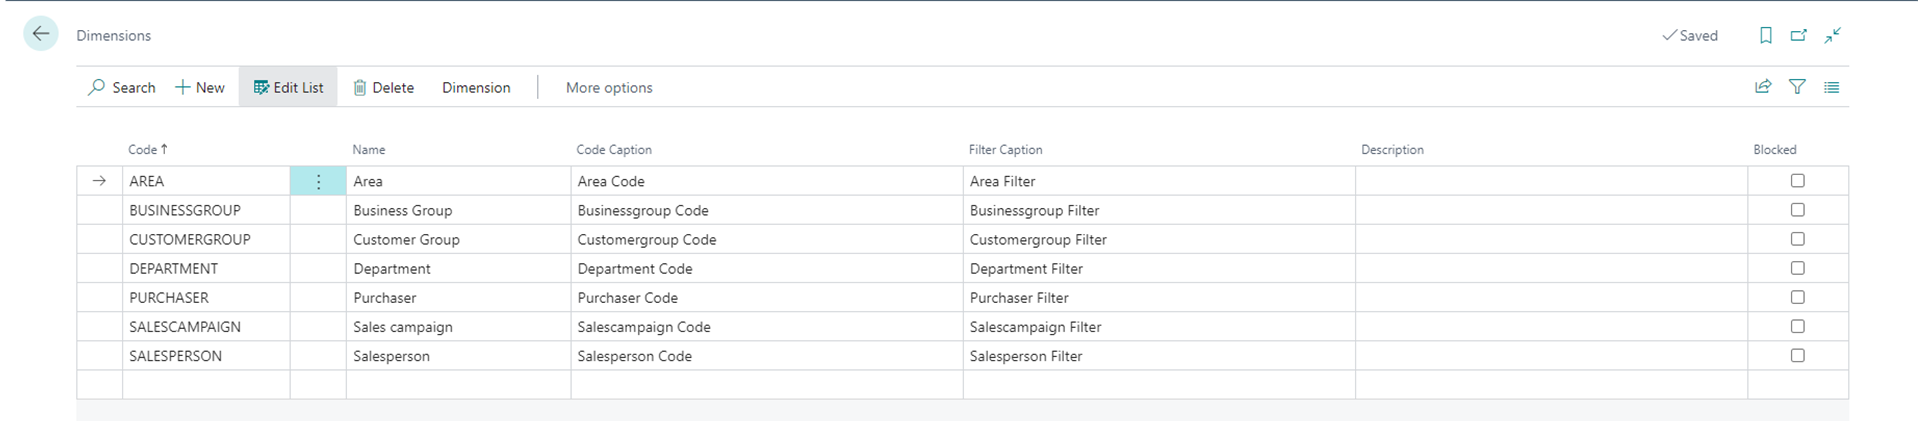
To manually create new dimensions, follow these steps:
-
Select the search for page icon in the top-right corner of the page, enter dimensions, and then select the related link.
-
Select New.
-
In the Code field, enter a unique identifier for the dimension.
-
In the Name field, enter the full name of the dimension.
Other than the Code and Name fields, the Dimensions page also contains the following fields:
-
Code Caption - Determines the field name of a shortcut dimension. When a dimension is set up as a shortcut dimension, the dimension will be shown as a field when you are entering dimensions in a journal or document.
-
Filter Caption - Determines the name of the dimension filter field when a dimension is used as a filter.
-
Description - Describes the dimension to clarify its purpose.
-
Blocked - Blocks the posting of journals that contain specific dimensions.
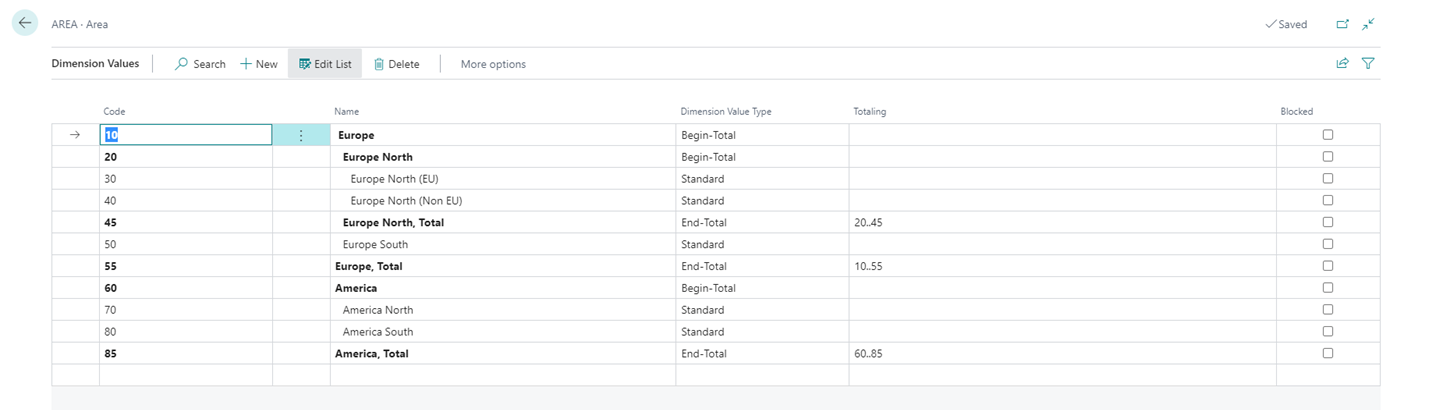
After you have created a new dimension, you can set up dimension values. For example, if you have created the dimension department, you can set up values like Sales, Administration, or Production. A dimension can have as many values as you want.
To create new dimension values, follow these steps:
-
Select the Search for Page icon in the top-right corner of the page, enter dimensions, and then select the related link.
-
Select the line with the dimension for which you want to set up new dimension values.
-
On the action menu, select Dimension and then Dimension Values.
-
Enter information into the following fields:
-
Code - Provides a unique code for the dimension value.
-
Name - Provides the full name of the dimension value.
-
Dimension Value Type - Determines how a dimension value is used when posted. By using these types, a hierarchical relationship between the dimension values can be set up. Some dimension values can be considered as subsets of another dimension value by Business Central. The options in this field are:
-
Standard - Standard posting of dimension values.
-
Heading - Heading for a group of dimension values.
-
Total - Total of a series of balances on dimension values that don't immediately come before the total dimension value.
-
Begin-Total - Marker for the beginning of a series of dimension values to be totaled. This option is used with the End-Total dimension value type.
-
End-Total - Total of a series of dimension values. This option is used with the Begin-Total dimension value type.
-
-
Postings can only be made to dimension values with a Standard or Begin-Total value type.
-
Totaling - Identifies a dimension value interval or a list of dimension values, which are used to total the entries for the dimension values that are displayed in the field to give a total balance. The options in this field are:
-
Blank - If the Dimension Value Type is Standard, Heading, or Begin-Total.
-
Manually populated - If the Dimension Value Type is Total (or End-Total).
-
Automatically populated - When the Indent Dimension Values function is run, or if End-Total is selected.
-
-
Blocked - Blocks the posting of journals that contain specific dimension values.
To access the Indent Dimension Values function, select Actions > Functions > Indent Dimension Values.
The following results are created when you use the Indent Dimension Values function:
-
Indents all dimension values between Begin-Total and the matching End-Total by one level.
-
Totals all dimension values within the same range and updates the Totaling field for each End-Total.
Differentiate dimensions and posting groups
General posting groups and dimensions have similar characteristics. Both are used for analyzing and grouping sales and purchases. For example, grouping sales by geographical area can be done by using general business posting groups, but also by using dimensions.
Whereas general posting groups only provide a link to G/L accounts, dimensions offer more extensive analysis and reporting functionalities. Also, when expanding business, it's less difficult to create new dimensions and dimension values than it is to create new general posting groups that have accompanying G/L accounts.
Set up global and shortcut dimensions
Through the General Ledger Setup page, you can set up dimensions as either a global dimension or a shortcut dimension.
-
Global dimensions are used as filters, for example, on reports and batch jobs. You can use only two global dimensions, so choose dimensions that you'll use often.
-
Shortcut dimensions are available as fields on journal and document lines. You can create up to eight of these dimensions.
To set up shortcut dimensions, follow these steps:
-
Select the Search for Page icon in the top-right corner of the page, enter general ledger setup, and then select the related link.
-
On the Dimensions FastTab, you can manually assign shortcut dimensions three to eight.
Notice that shortcut dimensions one and two are the two global dimensions by default. You can change the global dimensions as follows:
-
On the General Ledger Setup page, on the Actions menu, select Functions and then Change Global Dimensions.
-
Change or enter Global Dimension 1 and Global Dimension 2.
You can choose between sequential and parallel processing:
-
Sequential: This is the default option. The change is done in one transaction that reverts all entries to the dimensions they had before the change. This option is recommended if the company contains relatively few posted entries where it will take the shortest time to complete. The process locks multiple tables and blocks other users until it's done. Note that on large databases, the process may not be able to complete in this mode. In that case, use the Parallel option.
-
Parallel: The dimension change happens in multiple background sessions and the operation is split into multiple transactions. To use this option, turn on the Parallel Processing toggle.
We recommended this option for large databases or companies with many posted entries because it will take the shortest time to complete. Note that with this mode, the update process won't start if there are more than one active database sessions.
For parallel processing, you must run the Prepare function first by selecting Parallel on the Action menu. Running this function will fill in the Log Entries FastTab with the list of tables that will be affected by the specified dimension change. You can also follow the progress of the background job.
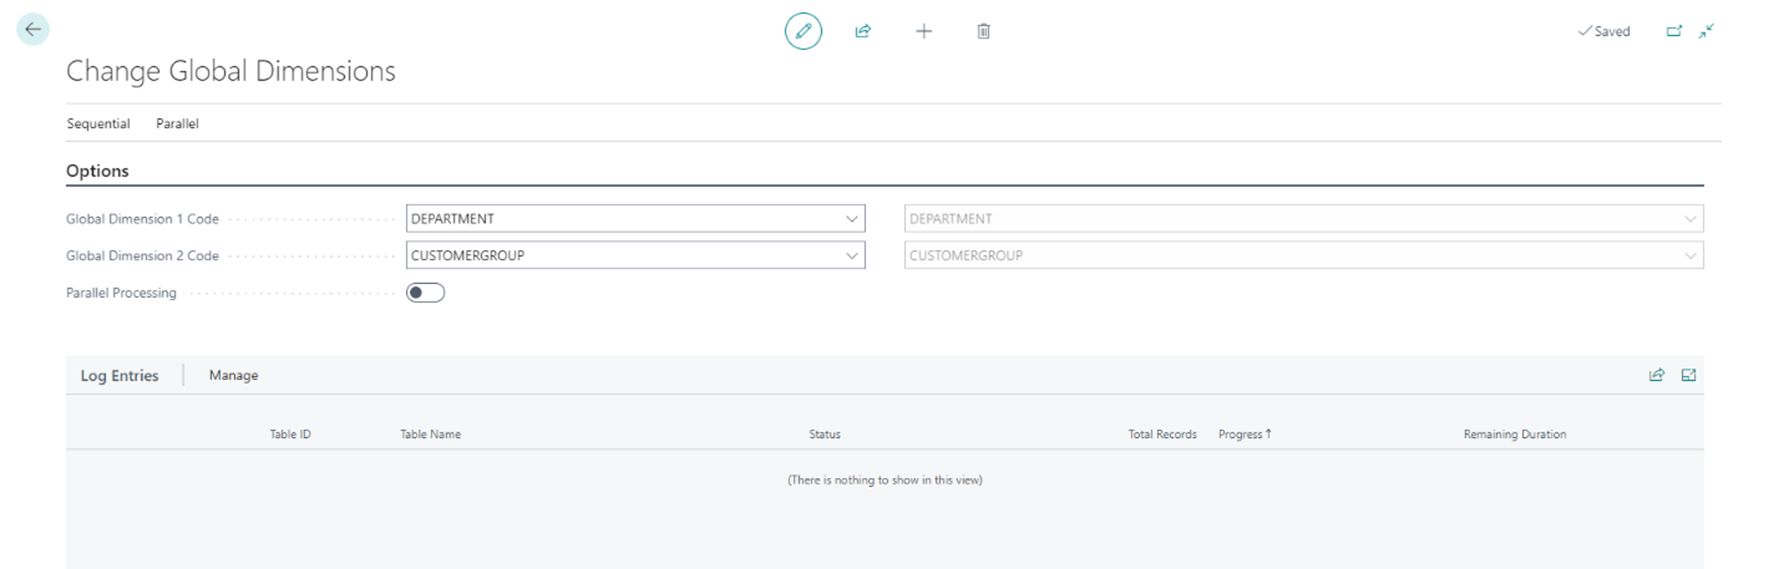
To start the job, select either Sequential or Parallel on the Action menu, and then Start, or in case of Parallel, Prepare.
Set up default dimensions
You can assign default dimensions for a specific account. The dimensions and dimension values are copied to the journal or document when you enter the account number on a header or a line, but you can delete or change the codes if appropriate. You can also specify which dimension values are allowed for an account.
Default dimensions can be entered for a single account or for multiple accounts. Setting up default dimensions for multiple accounts will save setup time.
For example, if you use an area, region, or country dimension instead of entering the default dimension on a customer per customer (Dimensions - single) basis, you can first apply a country/region code filter on the Customers page, select all the customers, and set the default dimension for all customers combined (Dimensions - Multiple).
You can use the Value Posting field to make dimensions and/or dimension values mandatory.
The value posting rules options are:
-
Blank - There is no posting restriction. This default dimension for this account can be posted with any dimension value or without a dimension value.
-
Code Mandatory - The default dimension for this account must have a dimension value when you are posting, but any dimension value is acceptable.
-
Same Code - The default dimension for this account must always have the same dimension value code as the one that was selected in the Dimension Value Code field.
-
No Code - Dimension value codes must not be used with this account.
If an account is used in the Adjust Exchange Rates batch job or the Post Inventory Cost to G/L batch job, do not select Code Mandatory or Same Code. These batch jobs can't use dimension codes.
In the Allowed Values Filter field, you can enter the dimension values that are allowed for the account you are assigning default dimensions to. The result is that users can pick from a predefined list of allowed dimension values on journals and documents.
To assign a default dimension to a customer, follow these steps:
-
Select the Search for Page icon in the top-right corner of the page, enter customer, and then select the related link.
-
Select the customer to which you want to assign the default dimension, for example customer 10000.
-
On the action menu, select Customer and then Dimensions-Single.
-
On the Default Dimensions page, in the Dimension Code field, select a dimension, for example DEPARTMENT.
-
In the Dimension Value Code field, select a dimension value, for example SALES.
-
If this dimension is now mandatory for customer 10000 and LARGE is the only possible dimension value, go to the Value Posting field and select Same Code.
-
If you also want to allow department ADM but not PROD as possible dimension values for this customer, select the Allowed Values Filter field.
-
Place a checkmark in the Allowed field for the SALES and ADM dimension value codes.
-
Close the Default Dimensions page.

Set up default dimensions for multiple accounts
You can also assign default dimension to multiple accounts at once, for example, to all customers of the same region of to all items of the same product group.
-
Select the search for page icon in the top-right corner of the page, enter customer, and then select the related link.
-
Select the customers to which you want to assign the default dimension, for example customers 10000, 20000, 30000, 40000, and 50000.
-
On the action menu, select Customer and then Dimensions-Multiple. If these customers already have default dimensions, they will appear in the Default Dimensions-Multiple page, but you can overwrite them to assign the same default dimensions to every customer in your selection.
-
On the Default Dimensions-Multiple page, edit or enter a new line for the AREA dimension by doing the following:
-
Select Edit List.
-
In the Dimension Code field, make sure AREA is selected.
-
In the Dimension Value Code field, select a dimension value, for example 70.
-
-
In the Value Posting field, select Code Mandatory.
-
If you also want to allow region 80 as possible dimension values for these customers, select the Allowed Values Filter field.
-
Place a checkmark in the Allowed field for the 70 and 80 dimension value codes.
-
Close the Default Dimensions page.
Set up dimension combinations
To avoid posting entries with contradictory or irrelevant dimensions, you can block or limit specific combinations of two dimensions. A blocked dimension combination means that you cannot post both dimensions on the same entry regardless of what the dimension values are. A limited dimension combination lets you post both dimensions to the same entry, but only for certain combinations of dimension values.
The setup occurs on the Dimension Combinations page, which you can access as follows:
-
Select the Search for Page icon in the top-right corner of the page, enter dimension combinations, and then select the related link.
-
On the Dimension Combinations page, select the dimension combination field and then select one of the following options:
-
No limitations - This dimension combination has no restrictions. All dimensions values are allowed.
-
Limited - This dimension combination has restrictions depending on which dimension values that you enter. You must define the limitations on the Dimension Value Combination page.
-
Blocked - This dimension combination isn't allowed.
-
-
Select a dimension value combination that is blocked and enter Blocked in the field. A blank field means that the dimension value combination is allowed. Repeat this step if multiple combinations are blocked.
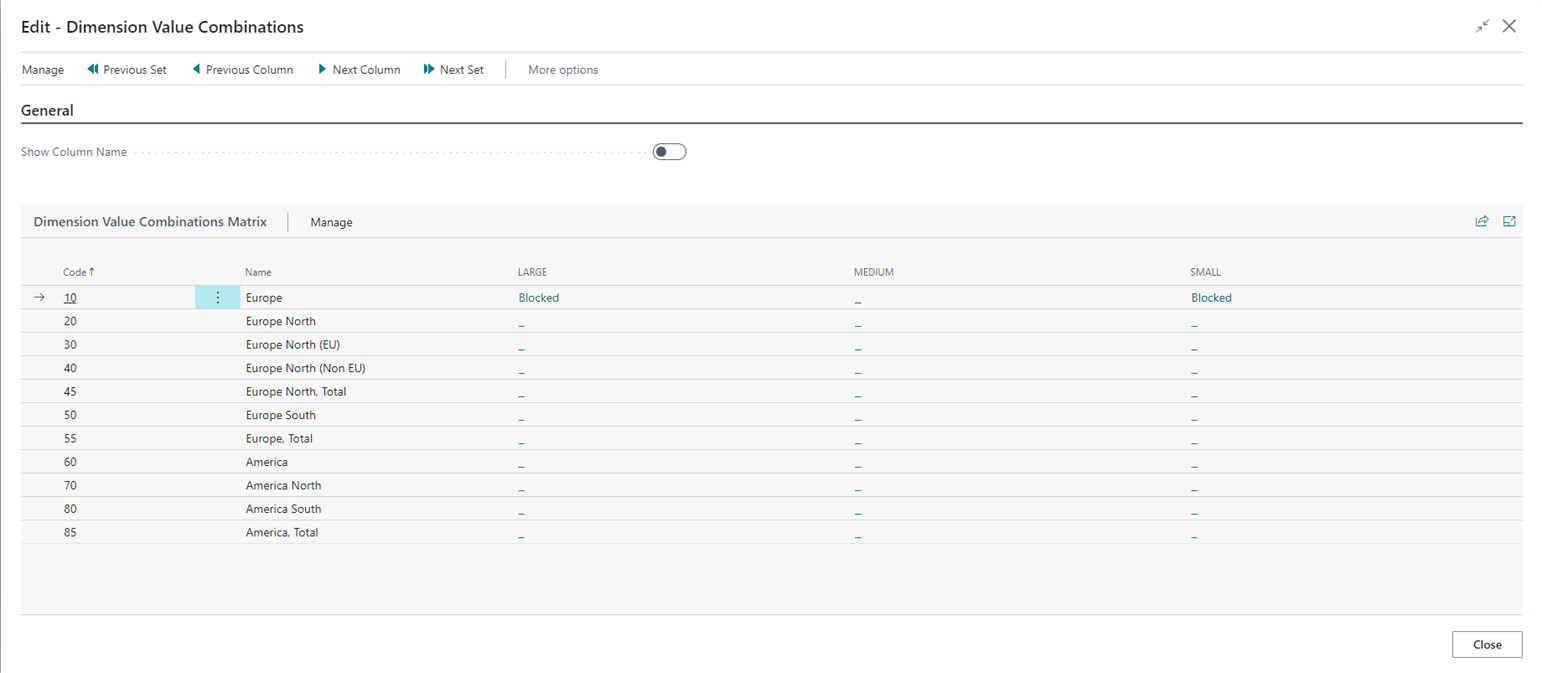
Dimension value combinations
You can also restrict a dimension combination, depending on which dimension value combination is being used for the two dimensions.
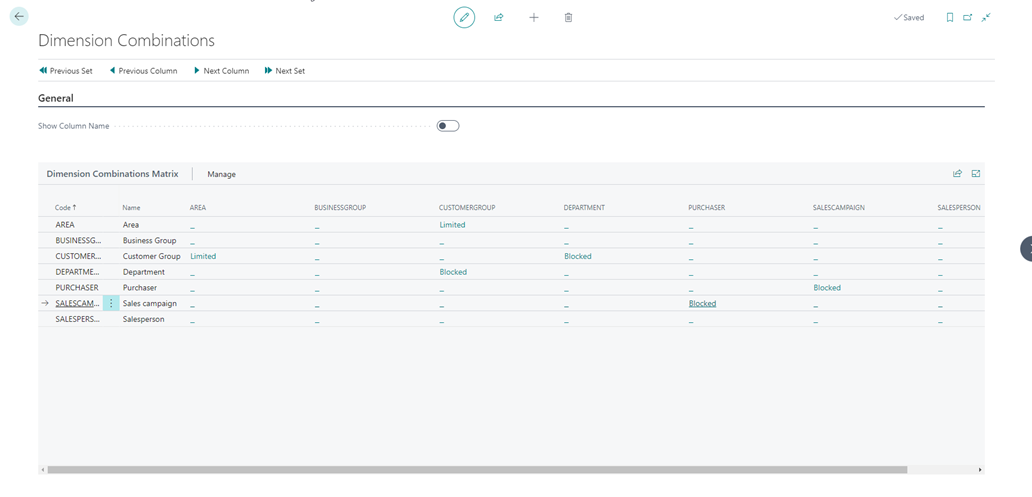
Open the Dimension Combinations page by selecting the lookup icon and entering dimension combinations. Follow these steps to restrict dimension value combinations:
-
Go to the Dimension Combinations Matrix page.
-
Go to a combination of two different dimensions, for example DEPARTMENT and CUSTOMERGROUP.
-
Select the Limited option.
-
Select the Limited option.
-
Select Yes to see a list of the dimension value combinations.
-
The Dimension Value Combinations Matrix FastTab displays a matrix of all combinations of dimension values for a dimension combination. The rows represent the dimension values of the dimension that is selected in the rows of the Dimension Combinations Matrix page. The columns represent the dimension values of the dimension that is selected in the column of the Dimension Combinations Matrix page.
-
The column headings can be changed from the dimension code to the dimension name by selecting the Show Column Name slider on the General FastTab.
-
The combination restriction options are:
-
Open - The dimension value combination is always allowed on entries. This is the default setting for dimension value combinations.
-
Blocked - The dimension value combination is excluded from use on entries.
-
-
Close the Dimension Value Combinations and the Dimension Combinations pages.
If you try to post a document with blocked dimensions or dimension values, you will receive the error that is shown in the following screenshot.
