Chart of Accounts
Note: the below documentation is provided by Microsoft. To make sure you are reading the most up to date documentation, please use the official Microsoft Dynamics 365 Business Central documentation link.
Setting up G/L accounts
The income statement and balance sheet are two important company financial reports. In Business Central, an account in the income statement and the balance sheet is called a G/L account, and all the G/L accounts make up the Chart of Accounts list.
In the Chart of Accounts list, all G/L accounts are available and can be viewed at one time. However, there is also a G/L Account Card for each account, and this can be accessed from the Chart of Accounts list.
You can use G/L account cards to create and edit G/L accounts. The G/L account card has the following five FastTabs:
-
General
-
Posting
-
Consolidation
-
Reporting
-
Cost Accounting

In this scenario, let's say that you need to create a new G/L account for telephone expenses. To create the account, follow these steps:
-
Select the Search for Page icon in the top-right corner of the page, enter chart of accounts, and then select the related link.
-
Select New.
-
Expand the General FastTab. The following table provides descriptions of the fields on the General FastTab and the data to enter for this demonstration.
| Field | Description | Demonstration data |
|---|---|---|
| No. | The number of the G/L account. | 613500 |
| Name | The name or description. | Telephone expenses |
| Income/Balance | Indicates whether the account is classified as an income statement of a balance sheet account. This field is important to determine whether an account must be closed in the fiscal year-end. | Income Statement |
| Account Category | Specifies the category of the G/L account, like assets, equity, and so on. This field is used for creating financial statements. | Expense |
| Account Subcategory | Specifies the subcategory of the account category of the G/L account. This field is used for creating financial statements. | Utilities Expense |
| Debit/Credit | Indicates the type of entries that will be posted to this account. The selection that is made does not restrict the type of transaction that is posted to the account. | Both |
| Account Type | Indicates the purpose for the account in the different lists, journals, and reports. The available options are: Posting - The only account type where entries can be posted. Heading - Used for description and reporting purposes only. Total - Used to total the accounts that are nominated in the Totaling field. Begin-Total - Marks the beginning of an account range in the Totaling field. End-Total - Marks the end of an account range in the Totaling field. | Posting |
| Totaling | Specifies an account interval or a list of account numbers. The program will total the entries of the accounts that are displayed in this field. Totaling formulas are possible for G/L accounts of the Total and End-Total account types. | <blank> |
| Balance | Displays the current balance of the account. Select the balance amount to access the General Ledger Entries list. | |
| Reconciliation Account | Determines whether the G/L account is included in the Reconciliation list in the general journals. Use the Reconciliation list before posting to review the effect of posting the accounts in the journal. | No |
| Automatic Ext. Texts | If this field is selected, extended text that is set up on the accounts is automatically added to the sales and purchase documentation in the Description field. If this field isn’t selected, extended text can still be set up on the account and added to documents manually. To create the extended text, select Extended Text on the Navigate tab. | No |
| Direct Posting | Indicates whether posting can move directly into this account from a journal line. This field is automatically selected when new accounts are created. G/L accounts, such as the receivables (trade debtors) account, that are posted based on posting groups are usually only set up for indirect posting. | Yes |
| Blocked | If you select this field, it prevents entries from posting to this account. Accounts can be blocked and reopened as needed. | |
| Last Date Modified | System-generated field that displays the date that the G/L account was last changed. | System generated |
| Omit Default Descr. in Jnl | Specifies if the default description is automatically inserted in the Description field on journal lines that are created for this general ledger account. | |
| Review Policy | Specifies how to allow reviews of G/L entries in the Review Policy field. |
- Expand the Posting FastTab. The following table provides descriptions of the fields on the Posting FastTab and the data to enter for this demonstration.
| Field | Description | Demonstration data |
|---|---|---|
| Gen. Posting Type | Defines whether the account is used only for a Sale or Purchase transaction or with both types of transactions. This field is used with the VAT Bus. Posting Group and VAT Prod. Posting Group fields to determine where the system will post VAT. The following options are available: <Blank>, Purchase, and Sale. | Purchase |
| Gen. Bus. Posting Group | Identifies the default general business posting group for the account. This field is used together with the Gen. Prod. Posting Group and Gen. Posting Type fields to find the G/L accounts to post to for sales, purchases, discount amounts, Cost of Goods Sold (COGS), and inventory adjustments. Because the general business posting group indicates whom you sell to or buy from, the customer’s or vendor’s general business posting group takes priority over the G/L account’s general business posting group. When no customer or vendor is involved in a transaction, the program will use the G/L account’s general business posting group. | DOMESTIC |
| Gen Prod. Posting Group | Identifies the default general product posting group for the account. This field is used with the Gen. Bus. Posting Group and Gen. Posting Type fields to find the G/L accounts to post to for sales, purchases, discount amounts, COGS, and inventory adjustments. The general product posting group of an item takes priority over the G/L account’s general product posting group. | SERVICES |
| VAT Bus. Posting Group | Identifies the default VAT Business Posting Group for the account. This field is used with the VAT Prod. Posting Group and Gen. Posting Type fields to determine the VAT percentage and the VAT calculation type and to find the G/L accounts where the program posts VAT. Because the VAT business posting group indicates whom you sell to or buy from, the customer’s or vendor’s VAT business posting group takes priority over the G/L account’s VAT business posting group. When no customer or vendor is involved in a transaction, the program will use the G/L account’s VAT business posting group. | DOMESTIC |
| VAT Prod. Posting Group | Identifies the default VAT Product Posting Group for the account. This field is used with the VAT Bus. Posting Group and Gen. Posting Type fields to determine the VAT percent and the VAT calculation type and to find the G/L accounts where the program posts VAT. The VAT product posting group of an item takes priority over the G/L account’s VAT product posting group. | VAT25 |
| Default IC Partner G/L Acc. No | Identifies the default Intercompany (IC) G/L account number for this G/L account. When you enter this G/L account in an intercompany general journal, the IC G/L account that is specified in this field is used as the default balancing account number. | <blank> |
| Default Deferral Template | Specifies the default deferral template that governs how to defer revenues and expenses to the periods when they occurred. | <blank> |
Review Policy on the General FastTab has a few options that weren't discussed above. The following options are available:
-
None: You can't mark entries for the account as reviewed. For example, use this option for accounts such as payables, receivables, and bank accounts where there are other ways to review their amounts.
-
Review allowed: You don't have to include entries in a review, and the amounts of the debit and credit entries don't have to balance. You remove a review, for example, if you've made a mistake.
-
Review allowed and match balance: The total amounts of the debit and credit entries in the review must match. The Debit and Credit fields show those amounts, and the Balance field shows the total. This setting also lets you remove a review. When you remove a review from one or more entries, the debit and credit entries must still balance.
Refer to the Review general ledger entries unit in this module for information on reviewing journal entries.
On the Consolidation FastTab, you can enter the debit and credit account of the consolidation company to map with. When running the consolidation from the consolidation company, the program creates general journal lines for each business unit, based on the mapping entered here. When the company has a different local currency than the consolidation company, you can select a consolidation translation method for the G/L account. This specifies the currency translation rate to be applied to the account.
On the Reporting FastTab, you can specify if you want to process exchange rate adjustments between the local currency and the additional reporting currency for this account.
The Cost Accounting FastTab shows the cost type the G/L account is mapped to.
For this example, you don't need to enter the Consolidation, Reporting, and Cost Accounting FastTabs.
If you completed the steps in the scenario, when you close the G/L account card, you should see the new G/L account you set up for telephone expenses appearing in the chart of accounts.
Use the chart of accounts
The chart of accounts shows the ledger accounts that store your financial data.
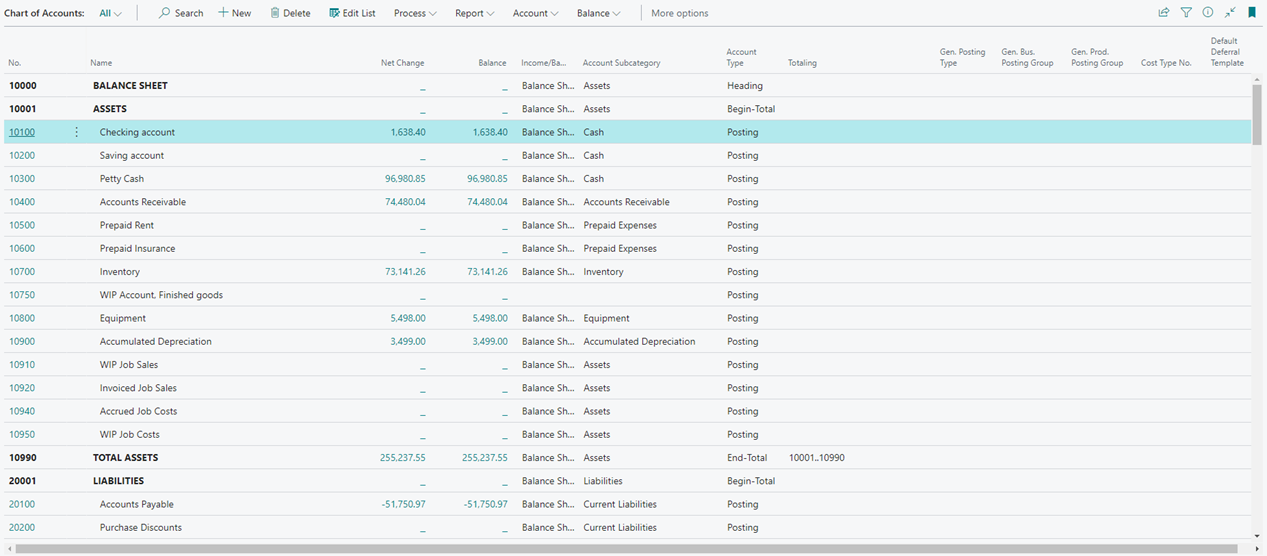
From the chart of accounts, you can open each G/L account. However, by selecting Edit List, you can also update current or create new G/L accounts. You can drill down on the Net Change and Balance fields to display the ledger entries of a G/L account.
The Chart of Accounts Overview page is a simpler version of the chart of accounts. If you just want a quick overview of the basics, such as net changes and balances, the Chart of Accounts Overview page is a useful alternative.
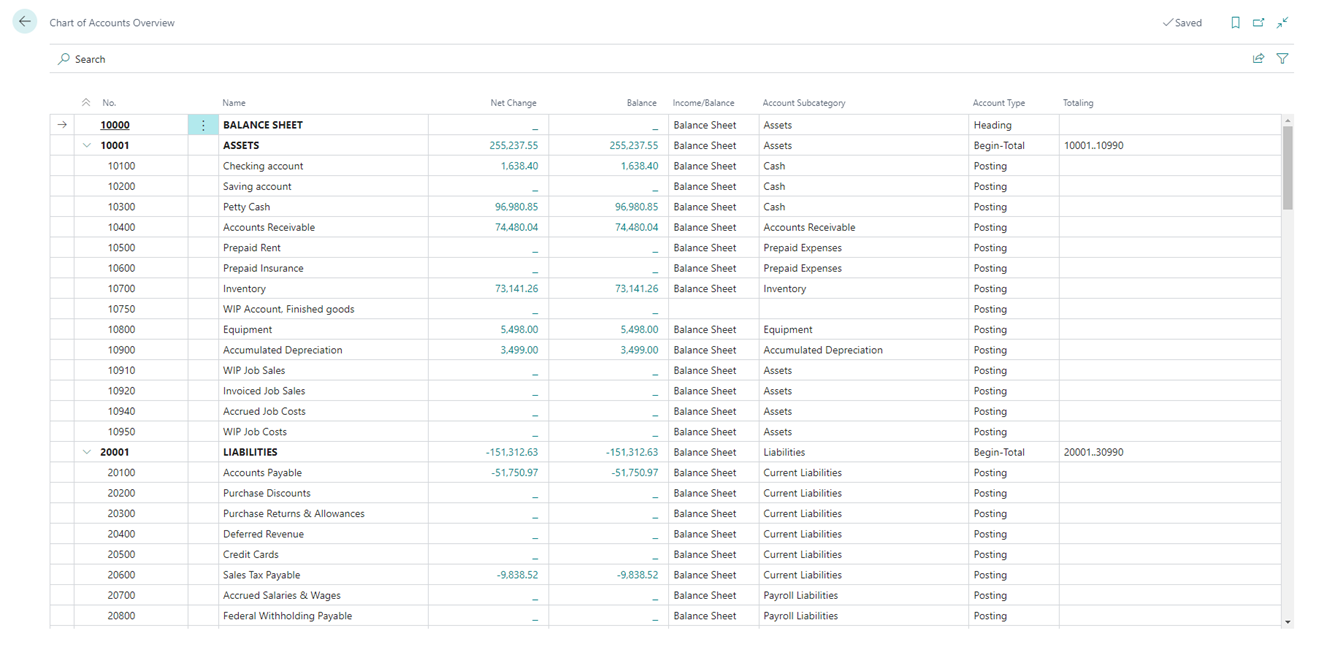
Just like the chart of accounts, it displays basic information like the net change and balance of all G/L accounts. You can collapse rows of account type Begin-Total. By bookmarking the Chart of Accounts Overview page, you have direct access from your role center.
Set up account categories and subcategories
The previous unit explained that you can assign G/L account categories and subcategories. This unit examines these categories and subcategories in more detail.
You can personalize the structure of your financial statements by mapping general ledger accounts to G/L account categories.
Besides structuring the chart of accounts, you can use the account categories and subcategories to create the following financial reports:
-
Balance sheet
-
Income statement
-
Cash flow statement
-
Retained earnings report
On a G/L account card, you can assign one of the following G/L account categories:
-
<blank>
-
Assets
-
Liabilities
-
Equity
-
Income
-
Cost of Goods Sold
-
Expense
You can further divide these G/L account categories into subcategories. Select the Search for Page icon in the top-right corner of the page icon, enter G/L account categories, and then select the related link.
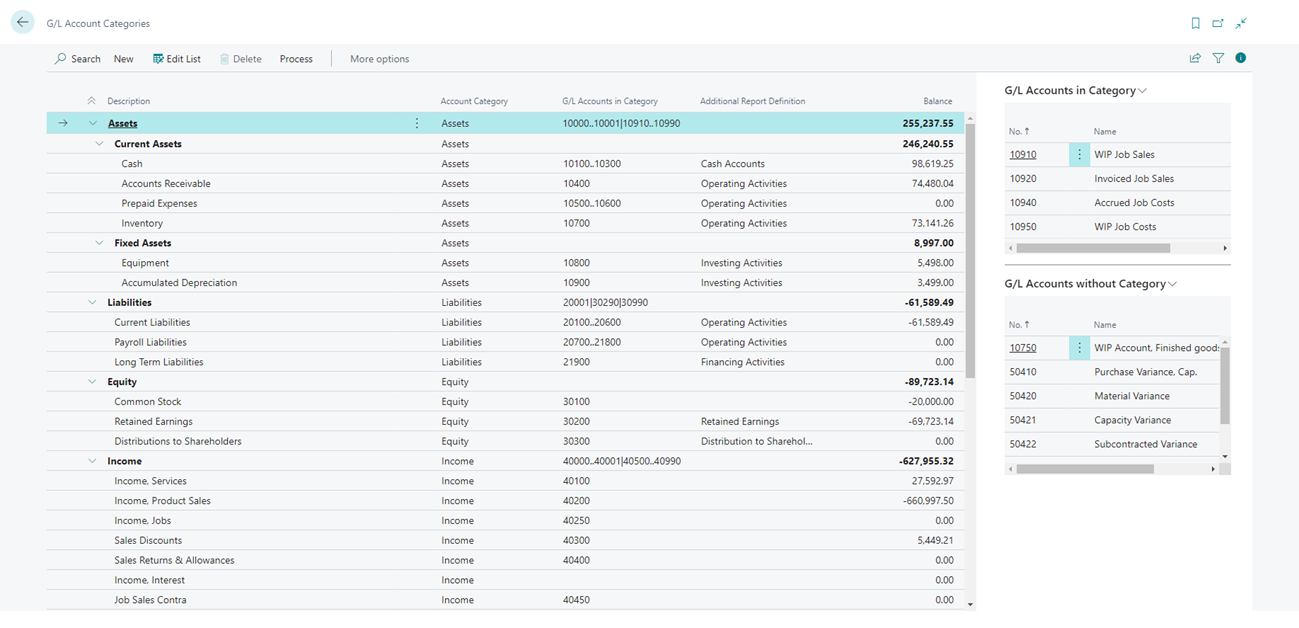
The G/L Account Categories window shows your categories and subcategories and the G/L accounts that are assigned to them. You can create new subcategories and assign those categories to existing accounts.
You can create a category group by indenting other subcategories under a line in the G/L Account Categories window. This approach simplifies your task of getting an overview because each grouping shows a total balance. For example, you can create subcategories for different types of assets and then create category groups for fixed assets versus current assets.
You can specify whether the accounts in each subcategory must be included in specific types of reports be selecting one of the following values in the Additional Report Definition field:
-
<blank>
-
Operating Activities
-
Investing Activities
-
Financing Activities
-
Cash Accounts
-
Retained Earnings
-
Distribution to Shareholders
Set up financial reports with account categories
Based on account categories and subcategories, you can generate account schedules for the following reports:
-
Balance sheet
-
Income statement
-
Cash flow statement
-
Retained earnings report
To create financial reports with account categories, follow these steps:
-
Select the Search for Page icon in the top-right corner of the page, enter G/L account categories, and then select the related link.
-
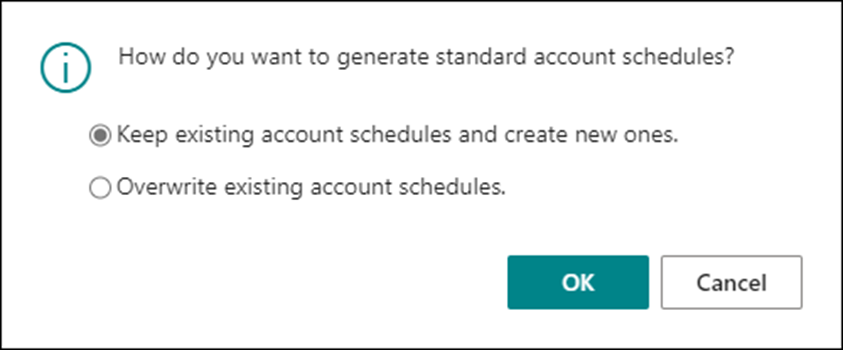
On the G/L Account Categories page, select Process and then Generate Account Schedules.
-
Specify if you want to create new account schedules or replace the existing ones and select OK. This only applies to the account schedules that are generated from the G/L Account Categories page and has no impact on the account schedules that are created manually.
Business Central will create four account schedules. The following fields on the G/L Account Categories page are used to generate the account schedules:
-
Account Category
-
Additional Report Definition
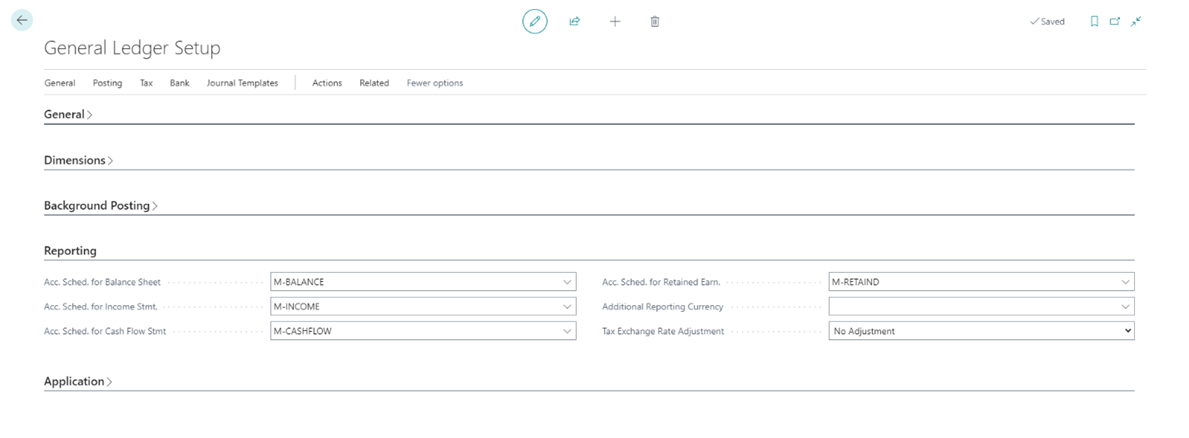
On the General Ledger Setup page, the four account schedules are specified on the Reporting FastTab.
You can run the report in several ways:
-
From the Account Schedules page
-
From the role center
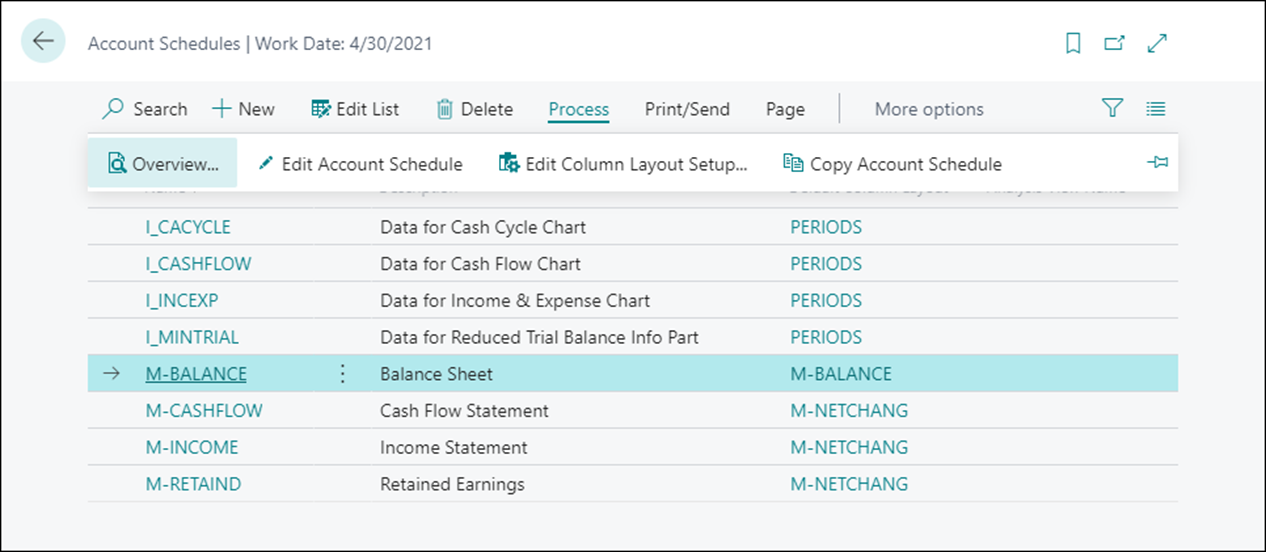
To run the reports from the Account Schedules page, follow these steps:
-
Select the Search for Page icon in the top-right corner of the page, enter account schedules, and then choose the related link.
-
On the Account Schedules page, select one of the account schedules, and select Process, and then Overview.
To run the reports from your role center, select Reports, and then Financial Statements.
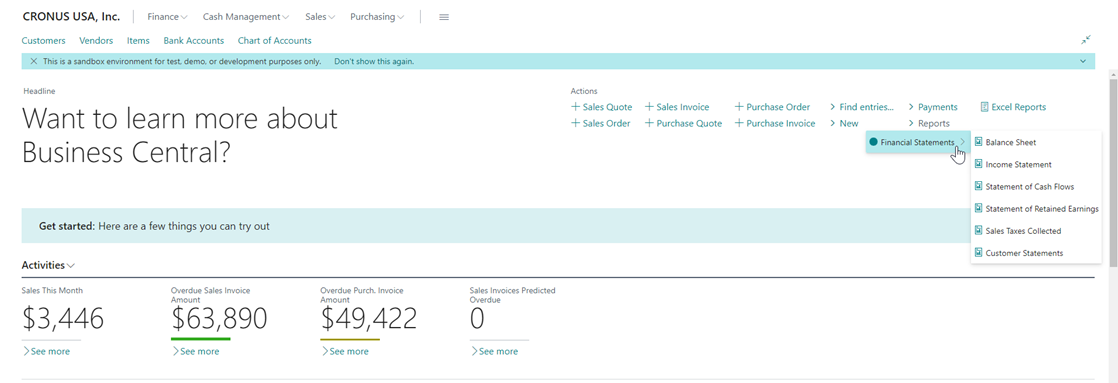
Keep in mind that these financial statements are not included in every role center. Only the roles that should have access to financial information (such as Business Manager and Accountant).
Maintain the chart of accounts
To maintain the chart of accounts, you might need to perform the following tasks:
-
Add or modify existing accounts
-
Delete accounts
-
Consult the Where-Used List
Add or modify G/L accounts
Typically, you can add new G/L accounts or modify existing ones from the G/L account card. However, you can also add or modify accounts from the Chart of Accounts list by following these steps:
-
Select the Search for Page icon in the top-right corner of the page, enter chart of accounts, and then select the related link.
-
Select Manage and then select Edit List.
-
You can now perform one of the following tasks:
-
Create a new G/L account - Select New and enter the fields as required.
-
Modify an existing account - Locate the account that you want to modify and make the required modifications.
-
Delete a G/L account
If you want to delete a G/L account, you must consider the following rules:
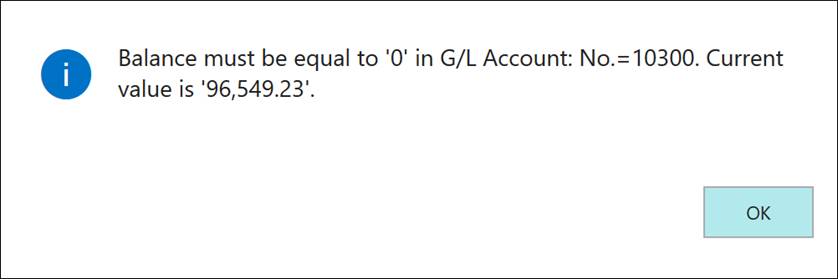
- The account that you want to delete must have a balance that is equal to zero (0).
- The account that you want to delete can't have ledger entries in a fiscal year that hasn't been closed yet.

Furthermore, you can set up two more conditions to prevent users from deleting G/L accounts. To do so, select the Search for Page icon in the top-right corner of the page, enter general ledger setup, and then select the related link.
On the General Ledger Setup card, expand the General FastTab and select Show more to display all fields. To add conditions to prevent the deletion of G/L accounts, consider the following fields:
-
Check G/L Account Usage - Specifies that you want the program to protect G/L accounts that are used in setup tables from being deleted. For example, if this field is enabled, you cannot delete accounts that are used in posting group setup tables, even if nothing is posted to the account.
-
Check G/L Acc. Deletion After - Specifies if and when general ledger accounts can be deleted. If you enter a date, G/L accounts with entries on or after this date can't be deleted.
If you want to prevent users from deleting a G/L account, even when all the above conditions are met, you can turn on the Block Deletion of G/L Accounts toggle on the General Ledger Setup page.
To block the deletion of G/L accounts, follow these steps:
-
Select the Search for Page icon in the top-right corner of the page, enter general ledger setup, and then select the related link.
-
Expand the General FastTab and click Show more to display all the fields.
-
Enable the Block Deletion of G/L Accounts field.
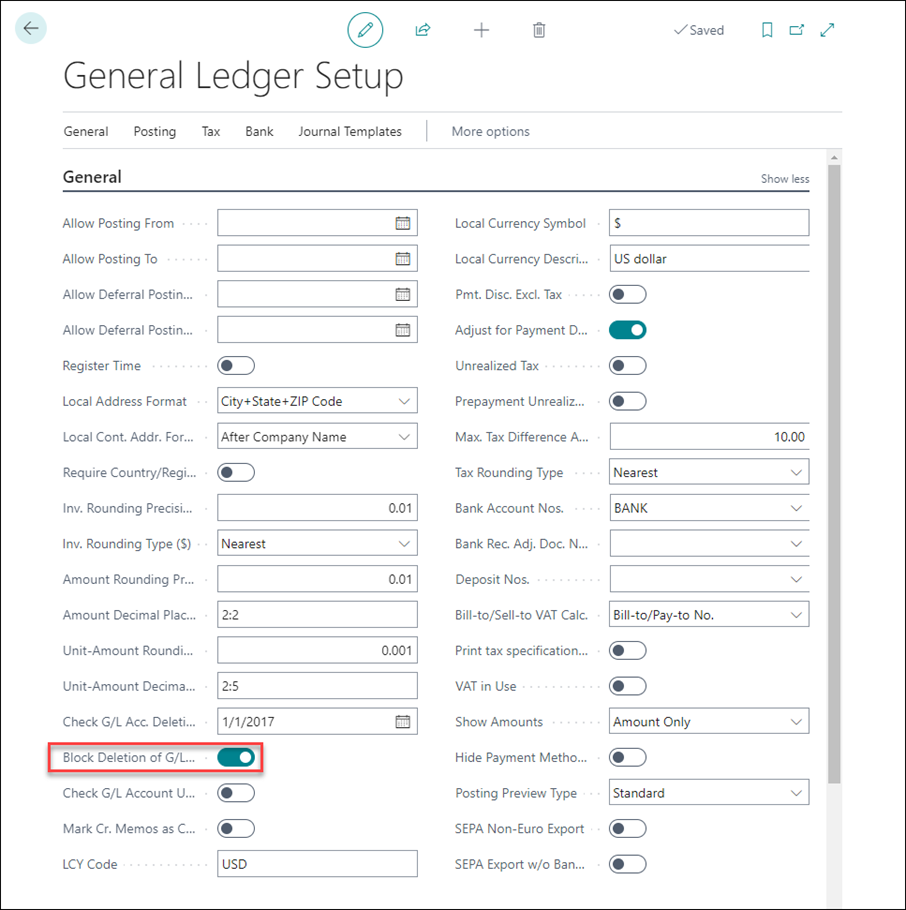
If you turn on the toggle, Business Central will prevent users from deleting accounts that have entries after the date that is specified in the Check G/L Acc. Deletion After field. If you must delete such accounts, a user who can access the General Ledger Setup page can turn off the Block Deletion of G/L Accounts toggle.
Note that deletion of G/L accounts with no entries or entries before the date in the Check G/L Acc. Deletion After field is still possible, even when the Block Deletion of G/L Accounts is turned on.
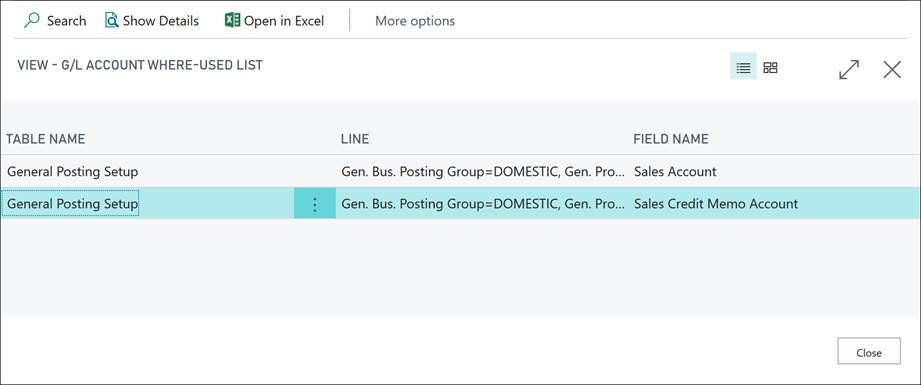
Consult the Where-Used List
You can use the Where-Used List to verify in which setup tables that a specific G/L account is used. This approach could be useful if you want to modify the setup or if you want to delete a G/L account.
To access the Where-Used List, follow these steps:
-
Select the Search for Page icon in the top-right corner of the page, enter chart of accounts, and then select the related link.
-
Select a G/L account, for example 404100 (Income, Services).
-
On the action menu, select Edit > Account > Where-Used List.
Review general ledger entries
To accelerate the period-end process of reviewing and reconciling G/L accounts, you can review the G/L entries for G/L accounts and mark the entries as Reviewed. Whether you can review the general ledger entries for a G/L account, is specified in the Review Policy field on the General FastTab of the G/L account card.
For G/L accounts where reviewing is enabled, you can review general ledger entries as follows:
-
Select the Search for Page icon in the upper-right corner of the page, enter General Ledger Entries, and then select the related link.
-
Select Review Entries.
-
Select the entries on the page that you have reviewed, and then select the Set selected as reviewed option.
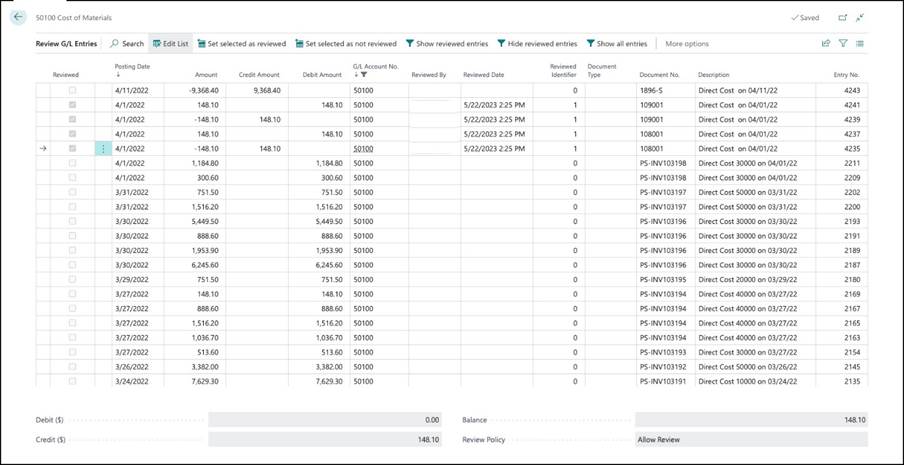
By marking entries as reviewed, the Reviewed By field displays the username and the Reviewed Date field the date and time the review was completed.
You can use the Set selected as not reviewed option to clear the Reviewed field for the selected entries.