
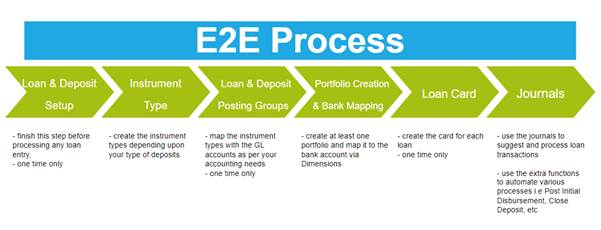
Elysys Loans Module
This document describes the standard functionalities of the Loans module of Elysys Loans for Microsoft Dynamics Business Central, as well as the required setup. A loan can be either a lending or a borrowing. Three types of loans can be managed within the system:
-
Interest only repayment
-
Fixed capital repayment
-
Fixed capital and interest repayment

Loan & Deposit General Setup
The user must make sure the following settings had been set up:
Home Page ➔ Application Setup ➔ Setup ➔ Loans and Deposits Setup ➔ Button: New
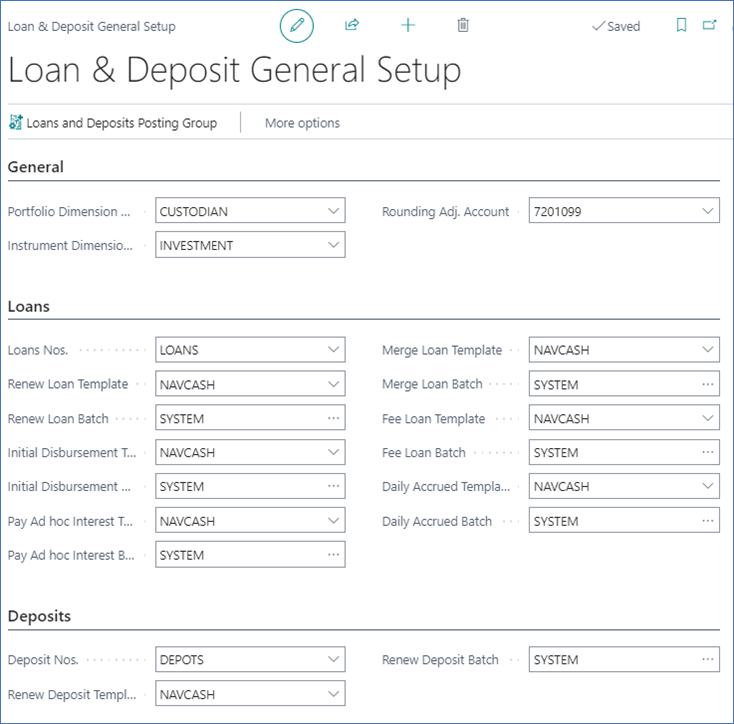
Figure 1 Loan & Deposit General Setup
General FastTab: select the Portfolio and the Instrument dimensions to be used. These 2 dimensions will be used to track all entries generated by the system when posting a loan’s capital and interest payments. If the Dimensions do not exist, you will need to create them.
When posting entries in a foreign currency, adjusting entries might be generated and will be posted to the account filled in “Rounding Adj. Account”. Then select a number series to number the accrued interest entries.
Loans FastTab: Select a number series for “Loans Nos” field to number all new loans. This will be used to create the instrument code which will be used to track the loan throughout the system. The Renew Loan Template and Batch fields need to be filled in if renewed loans are used.
Bundled Loans and Sales Invoice FastTab: Select a number series for “Bundled Loans Nos” field to number all new bundled loans. By default, loans linked to a customer will generate a Sales Invoice but will let the user review it before posting. If the “Post Loan Sales Invoices” option is selected however, the Sales Invoice will be posted automatically when processing the loan.
Home Page ➔ Administration ➔ Portfolio
At least one portfolio needs exist to create a loan. The Portfolio Currency (PCY) is compulsory as the financial system will calculate all amounts against PCY and LCY. Portfolios created from Elysys Wealth setup will appear in this list.
If a new portfolio needs to be created, click the Button: New.
Exchange rates to be used specially with the Loans & Deposits module can be imported using the PCY Cash Curr. Exchange Rate page. If this is not necessary, make sure to tick the box “Financial base rates for PCY” on the Portfolio Card to use standard BC’s currency exchange rates (BC stands for Business Central).
Home Page ➔ Application Setup ➔ Instrument Type
Each loan is linked to an instrument type. The instrument type will define the accounting rules to be used during the loan’s lifetime. Create one or more instrument types based on how many accounting rules you require.
Home Page ➔ Application Setup ➔ Setup ➔ Loans & Deposits Posting Group
For each instrument type previously created, a set of accounts needs to be filled in. They will be used for the different functions performed on the loans such as the interest repayments (PNL Interest), revaluation (PNL/BS UR), the accrued interest (PNL/BS Accrued Interest) and the closing (PNL Realised).
Counterparty Setup
The financial system can manage Customer Loans (lending) and Bank Loans (lending and borrowing). Standard Business Central Customer & Bank modules are used for this purpose.
The user must select on the Loan Card the Counterparty Type and Counterparty Account to be used.
Bank Counterparty
Go to: Home Page ➔ Banks ➔ Button: New
Fill in the following mandatory fields:
General FastTab
-
No. : Unique code identifying the bank account;
-
Name: Bank account description;
Posting FastTab
-
Currency Code: Mandatory. The currency of the loan will match the bank account’s currency;
-
Bank Acc. Posting Group: Defines to which G/L Account the bank entries will be linked with;
From the Bank Account card, go to Bank Account ➔ Button Dimensions and fill in:
-
Dimension Code: Select the Portfolio Dimension filled in the Loan & Deposit General Setup
-
Dimension Value Code: Select the Portfolio to which you want to link the bank account. The same portfolio must be selected on the Loan Card.
Customer Counterparty
Go to: Home Page ➔ Payables & Receivables ➔ Customers Button: New
Fill in the following mandatory fields:
General FastTab
-
No. : Unique code identifying the Customer account;
-
Name: Customer account description;
Invoicing FastTab
-
Gen. Bus. Posting Group;
-
Customer Posting Group;
-
Currency Code: Mandatory. The currency of the loan will match the bank account’s currency;
Loan Card
All necessary information required by the system to manage a loan are to be filled in on the Loan Card.
To create a new loan, go to Home ➔ Loans tile ➔ Button: New
General FastTab
-
No.: type in a unique code, or skip to the next field to have this field automatically filled in;
-
Instrument Type: choose an instrument type from the list. This will define the accounting rules for the loan (see the above setup for more information);
-
Description: enter a description for the loan;
-
Portfolio Code: select a portfolio code from the dropdown list;
-
Portfolio Currency Code: will be automatically filled in based on portfolio’s currency code;
-
Lending: check this box if your loan is a lending. Unchecked, it will be a borrowing;
-
Counterparty Type: loans can be managed either using Bank Accounts or Customers. For the current documentation, the “Bank” counterparty type will be used;
-
Counterparty Account: choose a loan account to be used with this loan (see the above loans account setup for more information).
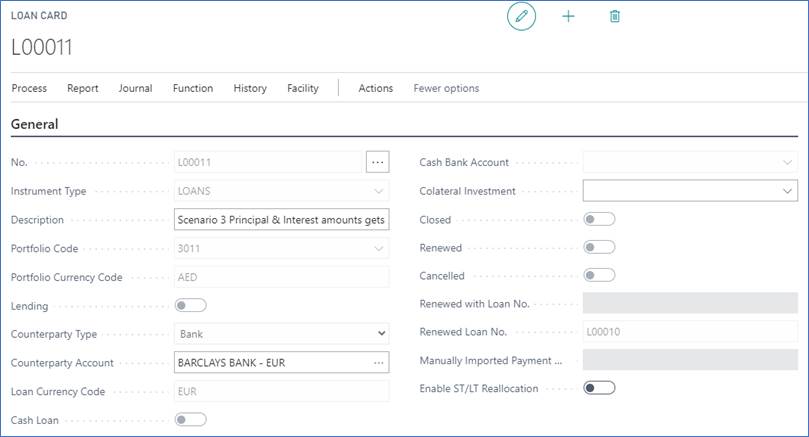
Figure 2 Loan Card, General FastTab
Settings FastTab
-
Loan Type: select the type of the loan (see loan types below)
-
Loan Amount (ICY): initial loan amount in loan currency. Increases or decreases can be done after the loan opening if needed;
-
Loan Limit Amount (ICY): field not mandatory. If set up, the user will get a warning if trying to increase the total loan amount higher than the limit amount;
-
Value Date: loan subscription date;
-
Maturity Date: loan maturity date;
-
Market Calendar Code: uses standard Business Central calendar function. Set up several calendars from which to pick up from. It lets the user define non-working days. The loan payments will then be processed the following next working day if it falls on a non-working day.
-
Rate Type: fixed or floating;
-
Rate (%): fixed annual percentage rate;
-
+ Base: if floating, a variable base rate will be added to the fixed rate. Select from the list;
-
Period: choose the frequency of the loan repayments;
-
Payment Amount: total payment amount per period. This field is recalculated when using the “Simulation” function. It can be changed using the function “Change Payment Amount”, which will also change the Maturity Date accordingly;
-
Day Count: calculation option for the interest amount;
-
Include Inception Day: if selected, the Value Date will be taken into account when calculating the interest amount for the first period of the loan. (Interest = First Payment Date – Value Date + 1)
-
Starting Date of Repayment: to be filled in if the loan needs to be postponed;
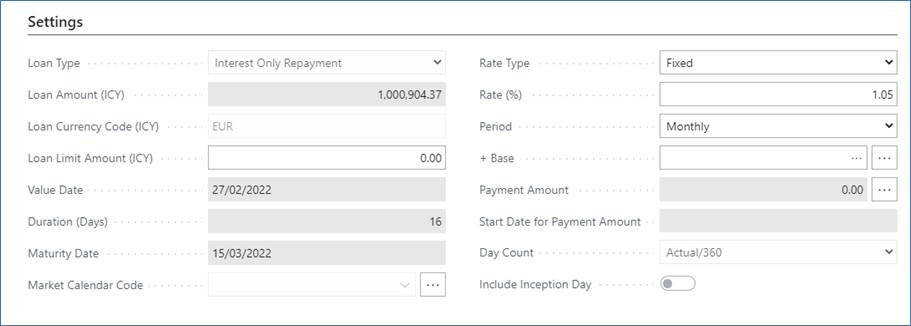
Figure 3 Loan Card, Settings FastTab
Postpone FastTab
-
Replace Date: Boolean field to select if the current start date of the repayments will be replaced
-
New First Payment Date: the new date at which the first repayment will start.

Figure 4 Loan Card, Postpone FastTab
Facility Management FastTab
-
Facility Loan:
-
Tranche:
-
Lender:
-
Merged into Loan No.:
-
Premium Day Count:

Figure 5 Loan Card, Facility Management FastTab
Loan Types
The loans module allows the management of the following types of loans:
-
Interest Only Repayment: loan in which, for a set term, the borrower pays only the interest on the principal balance;
-
Fixed Capital And Interest Repayment: loan in which, for a set term, the total due (capital + interest repayments) is constant. The total due can be changed by the user if needed and the Maturity Date will change accordingly.
-
Fixed Capital Repayment: loan in which, for a set term, the capital repaid is unchanged by period and the interest repayment is variable.
Postponement Types
Only loans type 2 can be postponed. There are 3 types of postponement:
-
Total – with capitalised interest: the total due amount is zero until the Starting Date of Repayment. The total loan amount is increased with the interest amount accumulated from the value date to the starting date of repayment.
-
Total – without capitalised interest: the interest amount accumulated from the value date to the starting date of repayment is added to the first loan repayment.
-
Partial – payment interest only: only the interest amount will be paid for the periods preceding the Starting Date of Repayment
Disbursements
The Loan Disbursements page give the user an overview of all the capital increases and decreases occurred for the loan. The first line corresponds to the initial loan disbursement. The user can add one or more lines by specifying the Posting Date and the Amount, as long as no other disbursement or payments have been done after the Posting Date. If a decrease needs to be booked for the loan, the Amount needs to be entered with a negative sign. A fee can be added to the disbursement operation if needed.
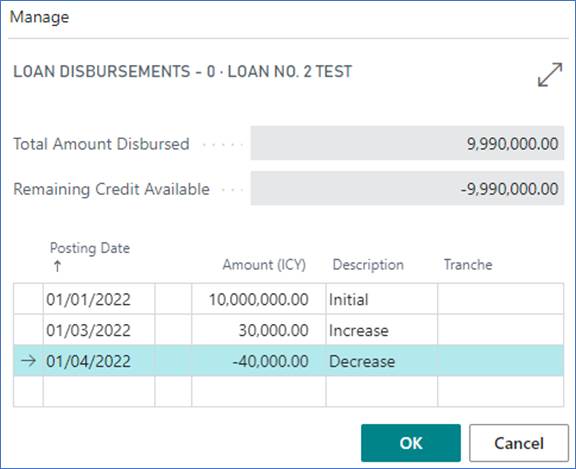
Figure 6 Loan Disbursement page
Payment Schedule
The Payment Schedule page gives the user a detailed list of past and future loan repayments. For each line the user can check the interest and capital amount, as well as the interest rate applied and other useful information.
The Modify function is user for adjusting the Posting Date and the Interest for non-posted repayments.
To cancel those changes, the functions “Reset Line” or “Reset All” can be used.
To distinguish posted from non-posted entries, the system will show the posted entries in a red colour.
In case where a repayment needs to be skipped, the Total Due needs to be = 0. To let the system know it needs to skip the line, the user needs to use the “Mark/Unmark as Posted” function. When the line is red (marked as posted), the user will be able to continue processing the following payments.
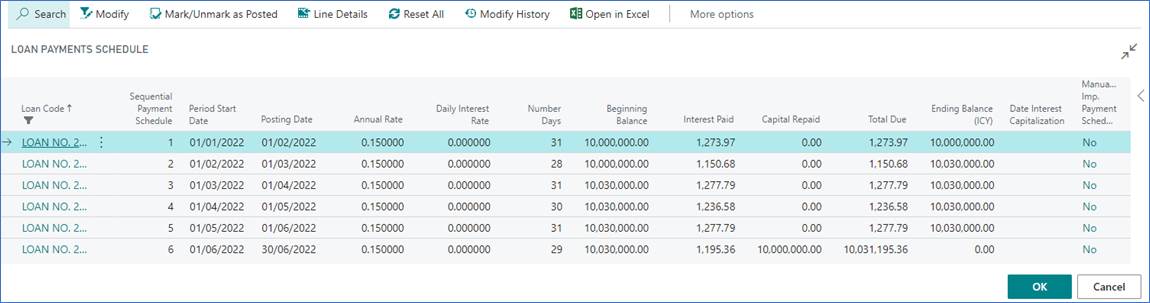
Figure 7 Payment Schedule page
Fees
The system allows the booking of fees at any point during the life of the loan. Simply access the Fees page from the Loan Card. For each fee transaction, the system requires: the Fee Code, the Posting Date, and the Fee Amount (ICY). Previously, the user will need to set up the Fee Card for each type of fee.
The Fee Card requires:
-
The Fee Code
-
The Fee Description
-
The Commission Type which must be “Fees”
-
The G/L Account specifying to which account the fee will be booked against.

Figure 8 Creation of a new Fee Card
Journals & Posting procedures

1. Loan & Deposit Journal
Go to: Home ➔ Loans ➔ Journals ➔ Button: Loan & Deposit Journal

Figure 9 Loan & Deposit Journal window
The Loan & Deposit Journal is used to generate and post loan disbursements and capital and interest repayments.
Click on the button “Suggest Entries” to generate posting entries. The journal will populate the table with the outstanding Capital and Interest payments at the desired date, for one or more loans depending on the filters. The system creates 2 distinct lines, one for the capital repayment and one for the interest repayment, as they are posted to different ledgers in the system.
The user can delete the entries which he doesn’t want to post. However, it is important to pay attention to not delete only part of a repayment (i.e. delete the interest line and post the capital line), as the repayment will be marked by the system as fully booked. The user can look at the Document No. to know what lines are grouped together.
For loans in a foreign currency, the system will manage the difference in forex movement during the life of the loan. When the last repayment of the loan is generated and posted, the system will also post a forex realized amount. This amount is calculated based on all the historical capital repayments and adjusted as at the Posting Date of the loan closure.
Once the entries have been carefully verified, use the various available functions to:
-
Preview the lines to be posted (Button: Test Report)
-
Post the journal into the system (Button: Post)
-
Add Dimensions to a desired journal entry (Button: Dimensions)
-
Add Dimensions to several journal entries at once by selecting them (Button: DimensionsMultiple)
2. Accrued Interest Journal
Go to: Home ➔ Loans ➔ Journals ➔ Button: Accrued Interest Journal

Figure 10 Accrued Interest Journal window
The Accrued Interest Journal is used to generate and post accrued interest entries for one or more loans.
Click on the button “Suggest Entries” to generate posting entries.
When Accrued Interest entries are posted, reversing entries are also posted at “Posting Date +1”, as the interest payment is booked at full amount and the user doesn’t have to take care of reversing manually the accrued amount.
The option “GL Integration” allows the user to choose whether he wants to post the entries to the General Ledger or not. If the entries do not need to be posted to the General Ledger Entry, the box must be unchecked; this way, the system will only post them to the sub-ledger Accrued Interest Ledger Entry.
Once the entries have been carefully verified, use the various available functions to:
-
Preview the lines to be posted (Button: Test Report)
-
Post the journal into the system (Button: Post)
-
Add Dimensions to a desired journal entry (Button: Dimensions)
-
Add Dimensions to several journal entries at once by selecting them (Button: DimensionsMultiple)
3. Loan & Deposit Revaluation
Go to: Home ➔ Loans ➔ Journals ➔ Button: Loan & Deposit Revaluation
The Loan Revaluation Journal is used to generate and post forex revaluation entries for one or more loans.
The journal will use the exchange rate as at the revaluation date and adjust the Amount (LCY) accordingly.
Click on the button “Suggest Revaluation” to generate posting entries. When Loan Revaluation entries are posted, reversing entries are also posted at “Posting Date +1” so the user doesn’t have to take care of manually reversing the forex unrealized amount.
Once the entries have been carefully verified, use the various available functions to:
-
Preview the lines to be posted (Button: Print Preview)
-
Post the journal into the system (Button: Posting)
-
Add Dimensions to a desired journal entry (Button: Dimensions)
-
Add Dimensions to several journal entries at once by selecting them (Button: DimensionsMultiple)
4. Loan & Deposit IFRS Year End Closing
Go to: Home ➔ Loans ➔ Journals ➔ Button: Loan & Deposit IFRS Year End Closing
For entities complying with the IFRS regulations, Elysys Loans provides an IFRS accounting treatment.
Within the Loan & Deposit IFRS Year End Closing, the user can generate the needed entries to mark to market the foreign currency loans at the end of the fiscal year. Business Central standard currency exchange rates are used to adjust the outstanding loan capital.
Pre-Requirement: The Loan & Deposit Revaluation must be processed before running the IFRS Year End Closing process.
Click on the button “Suggest Revaluation” to generate posting entries. You will be prompted to choose from the already configured beginning periods of the fiscal years.
Once the entries have been carefully verified, use the various available functions to:
-
Preview the lines to be posted (Button: Print Preview)
-
Post the journal into the system (Button: Posting)
-
Add Dimensions to a desired journal entry (Button: Dimensions)
-
Add Dimensions to several journal entries at once by selecting them (Button: DimensionsMultiple)
5. Loan Reallocation Journal
User can reallocate the capital movement based on the Short/ Long Term distinction.
Prerequisites:
- To create the accounting period in the system: From Home Accounting Reports Accounting Periods

-
Setup the GL accounts in Loan and Deposits Posting Group for:
-
Loan Account Short Term,
-
Loan Account Long Term.
-

- Enable the field on the loan card: “Enable ST/LT Reallocation”

Functions & Navigation

Figure 11 Loan Card Ribbon, Tab Functions
Function: Simulation
The function Simulation accessible from the Loan Card is very useful to print out a repayment schedule, from the Value Date up to the total repayment of the loan.
Function: Interest Rates
The function Interest Rates is available for Loans set up with a floating interest rate. The function opens the page Interest Rate Line List where the user can insert the new variable rate for a specific starting date.
Function: Calendar
The function Calendar is available for Loans set up with a Market Calendar Code. The function opens the Calendar Card of the Calendar selected on the Loan Card. The user can set up non-working days, so the payments will be processed on the next working day.
Function: Early repayment
The Early Repayment function is used when the loan must be repaid in full at an earlier date than the Maturity Date.
The Date of Early Repayment must be:
-
Greater from all lines in Disbursement Line table;
-
If you have a payment schedule posted, then:
- (Date of Early Repayment \ Date of the last payment schedule posted)
-
And if you haven’t a payment schedule posted:
- (Date of Early Repayment < Date of the first payment schedule not posted)
Along the Date of Closure, the interest amount is automatically calculated. The user can modify the interest amount to be posted if needed. Once the function has been run, the payment schedule will be updated accordingly, and the loan can be posted normally.
Function: Renew with or without Capitalisation of Interest
The Renew Function is only available for "Interest Only Repayment" Type of Loans and Counterparty Type = "Bank".
The “Renew” function is used when a new loan is created based on an existing loan. Using this function, the user will be able to track which loan has been renewed with which other one. Additionally, it helps “cloning” an existing loan, only by changing the value and maturity dates (maturity date of the old loan becomes the value date of the new loan).
For the renewal “with capitalisation of interest”, the amount of the newly created loan will comprise the subscribed amount of the old loan, plus the interest for the last repayment period.
For the renewal “without capitalisation of interest”, the same loan amount as on the first loan will be filled in on the new loan card created by the system.

Figure 12 Loan Renewal with capitalisation of interest pop-up window

Figure 13 Loan Renewal without capitalisation of interest pop-up window
Function: Capitalise Interests
The Capitalise Interest Function is only available for "Interest Only Repayment" Type of Loans and Counterparty Type = "Bank".
With this function, the interest payments can be skipped for the current period. However, you still owe the money and you'll have to pay eventually. The interest charges are added to the loan balance, so you owe more and more as you capitalize. Capitalization is the process of adding interest charges to the existing loan balance.
As your loan balance increases, so do future interest charges. Capitalization is confusing because you don't receive additional funds. However, you enjoy the use of that money, keeping it in your pocket instead of making a payment. Your lender acts as if you borrowed those interest payments - and you pay additional interest on those interest charges.
Function: Change Payment Amount
The Change Payment Amount function is only available for "Fixed Capital and Interest Repayment" Type of Loans.
This function gives the possibility to change the total repayment amount of the loan (capital + interest). By default, Elysys Loans calculates the optimal repayment amount such as it is fully repaid by the maturity date entered by the user. Note that when this function is used, the maturity date of the loan will be updated based on the new repayment amount (i.e. if new amount < old amount, the new maturity date will be greater than the old maturity date).
Function: Change Maturity Date
The Change Maturity Date Function is only available for "Interest Only Repayment” Type of Loans. This function allows the user to adjust the Maturity Date at an earlier or future date. The Payment Schedule of the Loan will change accordingly.
Function: Cancel Loan
The Cancel Loan function can be used to “close” a loan in Elysys Loans without having to delete the card, for audit purposes for example. If a loan remains “open”, every time the user will generate the accounting entries, the capital and interest payments for that loan will appear. This function prevents this to happen.
Pay Ad Hoc interest
The Pay Ad Hoc function is only available for “Interest Only Repayment” Type of Loans. This functions allow the user to post any amount of the interest due to be repaid before the date as in the payment schedule. Once the user will post the entire amount or jus ta portion of the interest due, the payment schedule will automatically update the remaining amount of interest due to pe paid.

Figure 14 Pay Ad Hoc Interest function
Close & Extend
User can’t always change the Maturity Date. But usually, this function is used when user needs to renew the loan but with different terms, and for example you can add a variation amount to the remaining capital. This is different from Renew function as renew does not allow you to change any of the parameters and renews the loan for the exact same duration. Close & Extend is more flexible thus.
Facility – Collateral & LP Investment

Potential scenario: you borrow 100 million. You will start with withdrawing 15M, then for each subsequent Tranche you create a new Loan and link it to the initial Loan which is the "Facility". Then to borrow this 100M, you add some Collaterals against it that you can specify in the Collateral page (can be from multiple companies). Then the money borrowed is used to purchase other investments, so you specify those in "LP Investment" page. Then the Facility functionality calculates the collateral balance, LP Investment balance, checks the remaining amount, and so on.
Navigate functions
Loan & Deposit Ledger Entries
Shows all the ledger entries for the relevant “Loan No.”. The entries result from posting transactions in the Loan & Deposit Journal. The following types of entries are posted to the Loan & Deposit Ledger Entry: openings, closings, capital disbursements, capital repayments and unrealized forex.
Interest Ledger Entries
Shows only the interest entries for the relevant “Loan No.”. The entries result from posting transactions in the Loan & Deposit Journal.
Bank Ledger Entries
Shows bank entries linked to current “Loan No.”.
Renewed Ledger Entries
Shows the history of renewed loans and what the links between them are.
Accrued Interest Ledger Entries
Shows the accrued interest entries for the current loan.
Income Ledger Entries
Shows Forex realized entries.
Dimensions
Link Dimensions to the Loan. These Dimensions will be linked to all ledger entries linked to the underlying Loan No.

Figure 15 Accessing the Dimension page from the loan card