General Ledger Setup
Note: the below documentation is provided by Microsoft. To make sure you are reading the most up to date documentation, please use the official Microsoft Dynamics 365 Business Central documentation link.
Introduction
On the General Ledger Setup page, you can specify a default setting for the general ledger and other application areas. Be sure to complete general ledger setup for each company that you set up in Microsoft Dynamics 365 Business Central.
The five FastTabs on the General Ledger Setup page are:
-
General
-
Dimensions
-
Background Posting
-
Reporting
-
Application
To access the General Ledger Setup page, select the Search for Page icon in the upper-right corner of the page, enter general ledger setup, and then select the related link.
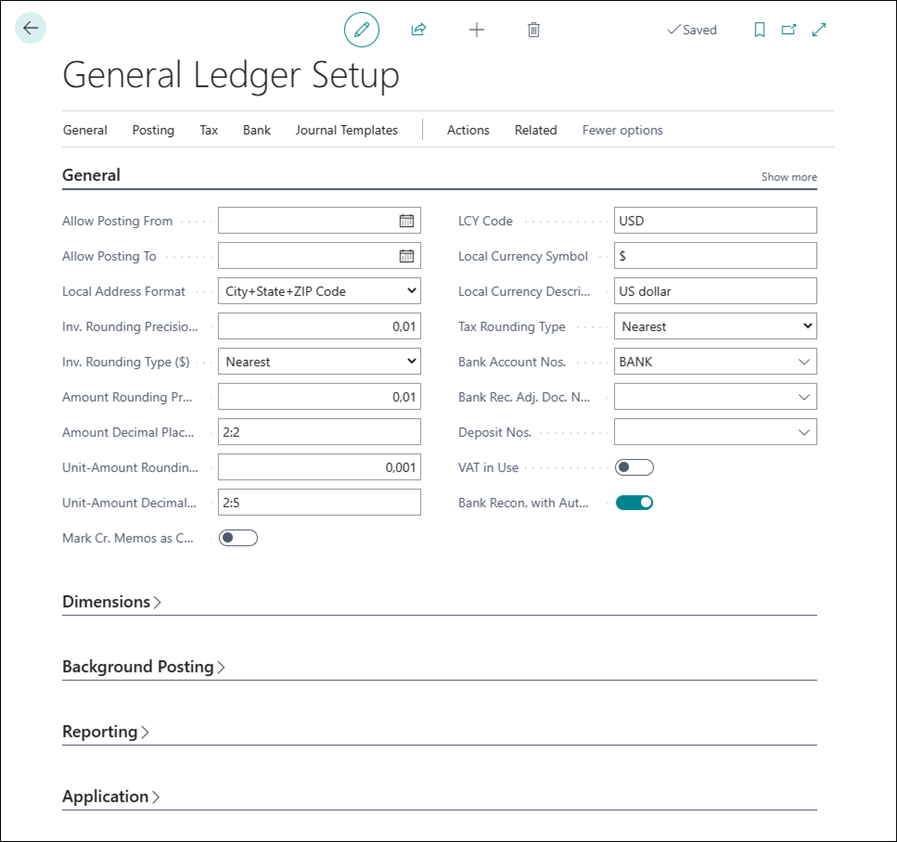
General FastTab
The General FastTab contains the basic setup defaults. To display all fields, select Show more. You can read a short description by selecting the field name.
The most-used fields on the General FastTab are:
-
Allow Posting From/Allow Posting To - These fields specify a date range that all users can post transactions in. Because a specific accounting period can’t be closed in Business Central, setting the posting date range prevents users from posting entries outside that date range. Other than specifying these dates in the general ledger setup, you can also assign them to users on the User Setup page.
-
Local Address Format - Specifies the format in which addresses must appear on printouts. For example, City+State+ZIP Code. Besides the local address format, you can specify the address format for each country on the Countries/Regions page. When you select the Require Country/Region Code in Address field on general ledger setup, the ZIP Code, City, and State fields will change when the value in the Country/Region Code field is changed. This provides users more control over address information.
-
Local currency settings - On the General FastTab, you can specify the company's local currency and related settings:
-
LCY Code - Specifies the local currency (LCY) that the company works with.
-
Inv. Rounding Precision - Specifies the size of the interval to be used when you're rounding invoice amounts in LCY. On the Currencies page, you can specify how to round invoices in foreign currencies.
-
Inv. Rounding Type - Specifies how to round invoice amounts. The contents of this field determine whether the invoice amount to be rounded will be rounded up or down to the nearest interval as specified in the Invoice Rounding Precision field. If you select Nearest, digits that are higher than or equal to five will be rounded up, and digits that are lower than or equal to five will be rounded down.
-
Amount Rounding Precision - Specifies the size of the interval to be used when you're rounding amounts in LCY. On the Currencies page, you can specify how amounts in foreign currencies are rounded.
-
Amount Decimal Places - Specifies the number of decimal places to show for amounts in LCY. This field covers amounts that are created with all types of transactions and is useful in helping you avoid inconsistencies when you're viewing or summing different amounts. The default setting is 2:2, which specifies that all amounts in LCY will show with a minimum of two decimal places and a maximum of two decimal places. You can also enter a fixed number, such as 2, which also means that amounts will show with two decimals. On the Currencies page, you can specify how many decimal places to show for amounts in foreign currencies.
-
Unit-Amount Rounding Precision - Specifies the size of the interval to be used when you're rounding unit amounts, items, or resource prices for each unit in LCY. Examples of unit-amounts are item prices and resource prices. On the Currencies page, you can specify how unit amounts in foreign currencies are rounded.
-
Unit-Amount Decimal Places - Specifies the number of decimal places to show for unit amounts, items, or resource prices for each unit in LCY. On the Currencies page, you can specify how many decimal places to show for unit amounts in foreign currencies.
-
Local Currency Symbol - Specifies the symbol for the local currency that you want to appear on checks and charts, such as the dollar ($) symbol for US dollars (USD).
-
Local Currency Description - Specifies the description of the local currency.
-
Tax/VAT Rounding Type - Specifies how the program will round tax/VAT when it's calculated for the local currency. When you enter an amount that includes tax/VAT in a document, the system first calculates and rounds the amount excluding tax/VAT and then calculates by subtracting the tax/VAT amount because the total amount must match the amount including tax/VAT that was entered manually. In that case, the tax/VAT rounding type doesn’t apply because the amount excluding tax/VAT is already rounded by using the amount rounding precision.
-
-
Bank Account Nos. - Specifies the code for the number series that will be used to assign numbers to bank accounts.
-
Bank Rec. Adj. Doc. Nos. - Specifies the document number of the bank reconciliation adjustment for general ledger setup. You can select the document number from the No. Series table.
-
Bank Recon. with Auto. Match - Specifies the feature to use for reconciling bank accounts. If you turn on this toggle, you’ll use the Payment Reconciliation Journals page, which supports the import of bank statement files. If it’s turned off, you’ll use the Bank Rec. Worksheet page, which is better for checks and deposits.
-
Enable Data Check - Specifies whether Business Central validates the data you enter in documents and journals while you type. For documents, you can turn on the check and messages will be shown in the Document Check FactBox. For journals, messages are always shown in the Journal Check FactBox. You can find more information on the Enable Data Check feature in a following unit in this module.
Dimensions FastTab
On the Dimensions FastTab, you can set up the global and shortcut dimensions. Typically, the two global dimensions are the company's and are used in analysis reports. To set up the global dimensions, select General and then Change Global Dimensions.
The two global dimensions are always the first two shortcut dimensions. You can add shortcut dimensions to journals and document lines for fast and efficient entering of dimension values. On top of the first two shortcut dimensions, which are the two global dimensions by default, you can select six other shortcut dimensions.
Background Posting FastTab
On the Background Posting FastTab, you can specify if you want to post general ledger documents in the background. By using job queue entries, you can schedule general ledger postings, such as after work hours.
You can set up the following fields:
-
Post with Job Queue - Specifies if you use job queues to post general ledger documents in the background.
-
Post & Print with Job Queue - Specifies if you use job queues to post and print general ledger documents in the background.
-
Job Queue Category - Specifies the code for the category of the job queue that you want to associate with background posting. You can assign these codes to the job queue entry that you want to use to post general ledger documents.
-
Notify on Success - Specifies if a notification is sent when posting and printing is successfully completed.
-
Report Output Type - Specifies the output of the report that will be scheduled with a job queue entry when the Post and Print with Job Queue option is selected.
Reporting FastTab
The Reporting FastTab helps you determine whether another reporting currency is used. Another reporting currency is used when transaction information must also be available in a currency other than the local currency.
When another reporting currency is set up, users can run financial reports in the local currency and the other reporting currency.
You can also specify the account schedules for the following reports:
-
Balance sheet
-
Income statement
-
Cash flow statement
-
Retained earnings report
To generate these account schedules, follow these steps:
-
Select the Search for Page icon in the upper-right corner of the page, enter G/L account categories, and then select the related link.
-
Select Process > Generate Account Schedules.
These account schedules are based on the G/L account categories and subcategories. All G/L accounts must have a correct category and subcategory before you can generate these account schedules.
Application FastTab
You can use the fields on the Application FastTab to specify the following settings:
-
Currency rounding tolerance
-
How payments are applied to outstanding amounts, including payments from customers and payments to vendors.
The Application FastTab contains the following fields:
-
Appln. Rounding Precision - Specifies the size of the interval for rounding differences for the local currency (LCY). This parameter takes effect when you apply the LCY entries to entries in a different currency.
-
Payment Disc. Tolerance Warning, Payment Disc. Tolerance Posting, and Payment Discount Grace Period - Complete these fields to allow tolerances on payment discount terms.
-
Payment Tolerance Warning and Payment Tolerance Posting - Complete these fields to close outstanding receivables and payables with payment amounts that differ from what is owed.
-
Payment Tolerance % - Enter the percentage that the payment or refund can differ from the amount on the invoice or credit memo.
-
Max. Payment Tolerance Amount - Enter the maximum amount that the payment or refund can differ from the amount on the invoice or credit memo.
To change the payment tolerance, follow these steps:
-
On the General Ledger Setup page, select Actions > Functions > Change Payment Tolerance.
-
Select the All Currencies checkbox if you want to use the same payment tolerance settings for local and foreign currencies.
-
Leave the Currency Code field blank if you want to set up payment tolerances for the local currency. In this case, you can set up tolerance settings for foreign currencies on the Currency Card page.
-
Enter a percentage in the Payment Tolerance % field.
-
Enter an amount in the Max. Payment Tolerance field.
-
Select OK to run the Change Payment Tolerance batch job.
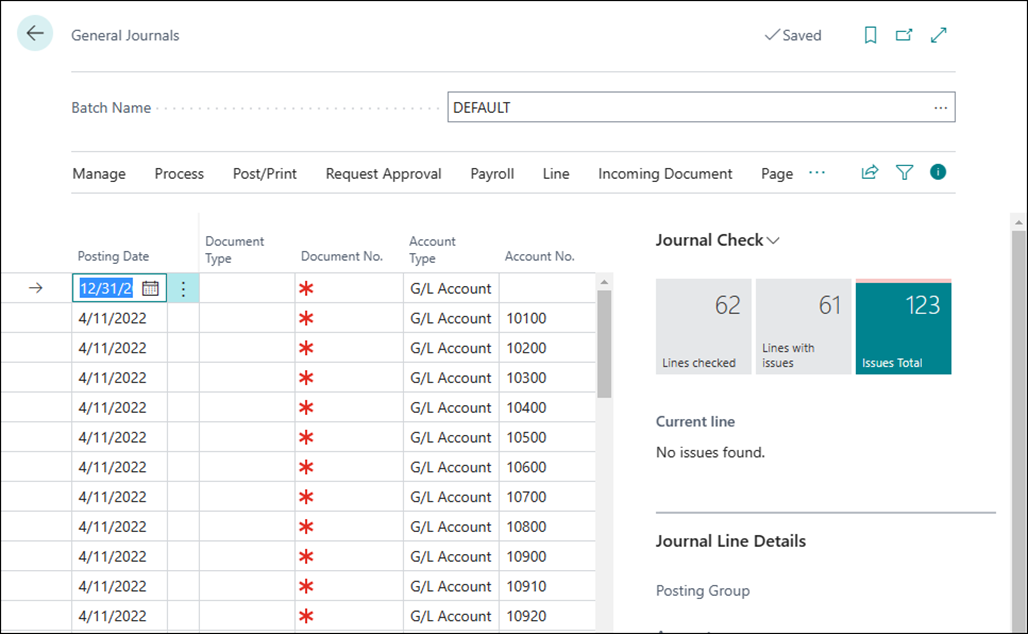
Enable data check
With the Enable Data Check feature selected on the General FastTab of the general ledger setup, Business Central can alert you about issues with data in documents and journals that can prevent you from posting.
These alerts are shown in the Document Check or Journal Check FactBoxes on documents and journals.
If you turn on the Enable Data Check toggle on the General Ledger Setup page, a notification will display on documents where the check document capability is available.
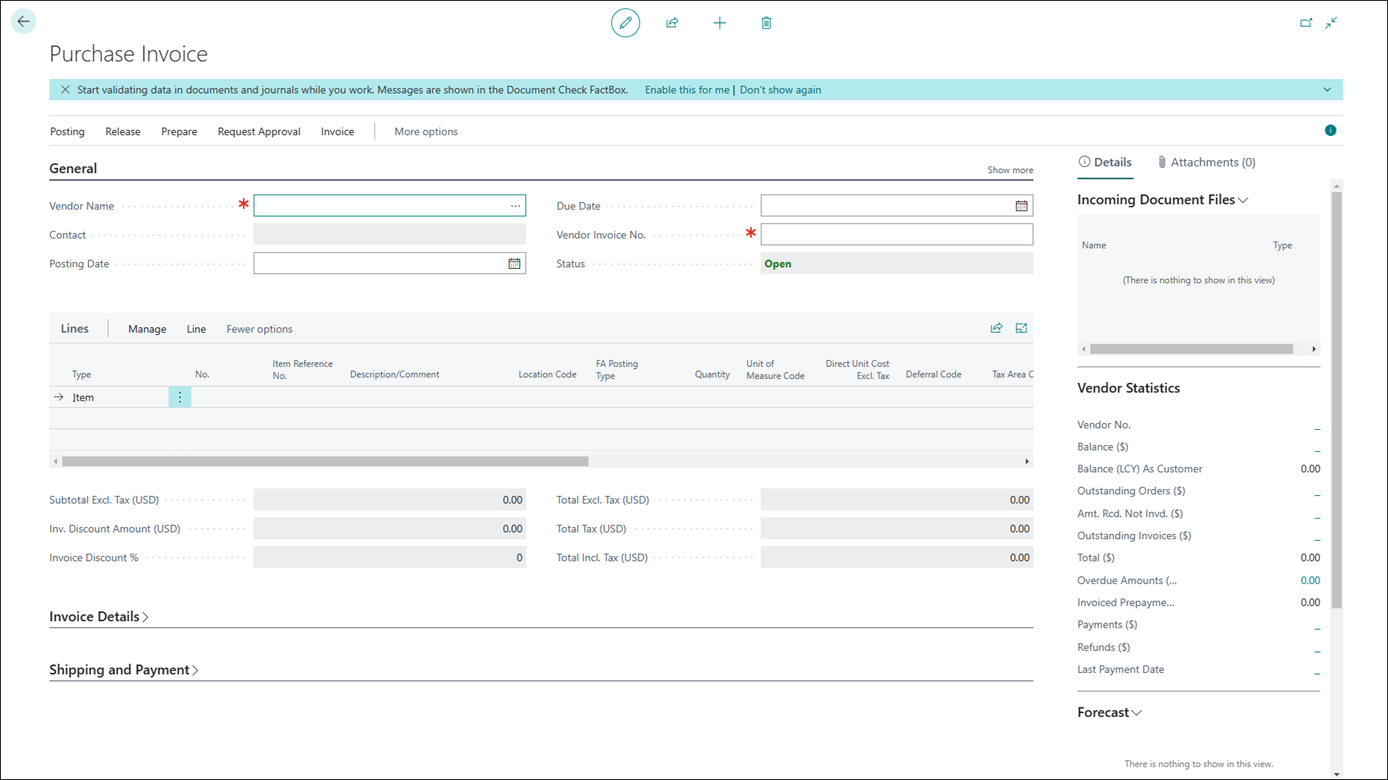
If you select Enable this for me in the notification, the Document Check FactBox will appear after you reopen the document page, and Business Central will start checking the document for issues while entering information. The Issues Total tile in the FactBox shows the total number of issues that Business Central found. You can choose the tile to open an overview of the issues.
If you want to stop using Document Check, you can turn off the Show the Document Check FactBox toggle on the My notifications page by following these steps:
-
Select the Search for Page icon, enter my notification, and select the related link.
-
Find the Show Document Check FactBox notification.
-
Clear the Enabled field.
On the My Notification page, you can only choose if you want to show the Document Check FactBox or not. Once the Enable Data Check field on the general ledger setup is selected, the Journal Check FactBox on journals is always displayed. There is no notification to turn it off. If you don’t want to display the Journal Check FactBox anymore, you can hide it by personalizing the page.